
What is a bastion host? It’s sometimes called a jump box, or in days gone by a sacrificial lamb. Technically, it’s just a machine that is directly exposed to the Internet. In general, you don’t want all of your machines directly exposed to the Internet. So you take one box and expose it through SSH to the outside world (or RDP if it’s a Windows box). If you need to administer a more private instance, you SSH into the bastion and from there you can SSH into the private instance (which doesn’t accept SSH connections from outside of your network) to do your administration task. So you two-hop into your network (jump box) and you assume the direct exposure to the Internet means you may get compromised at some point (sacrificial lamb).
So in this post, we’re going to look at a CloudFormation template for adding a Bastion Host to a VPC. We’re going to deploy our bastion host to an auto-scaling group, not so much for the purpose of high availability but rather for some measure of auto-healing. If the box goes south and stops responding, the auto-scaling group will kill it and bring up a new fresh instance.
Here is what our VPC will look like after deployment:
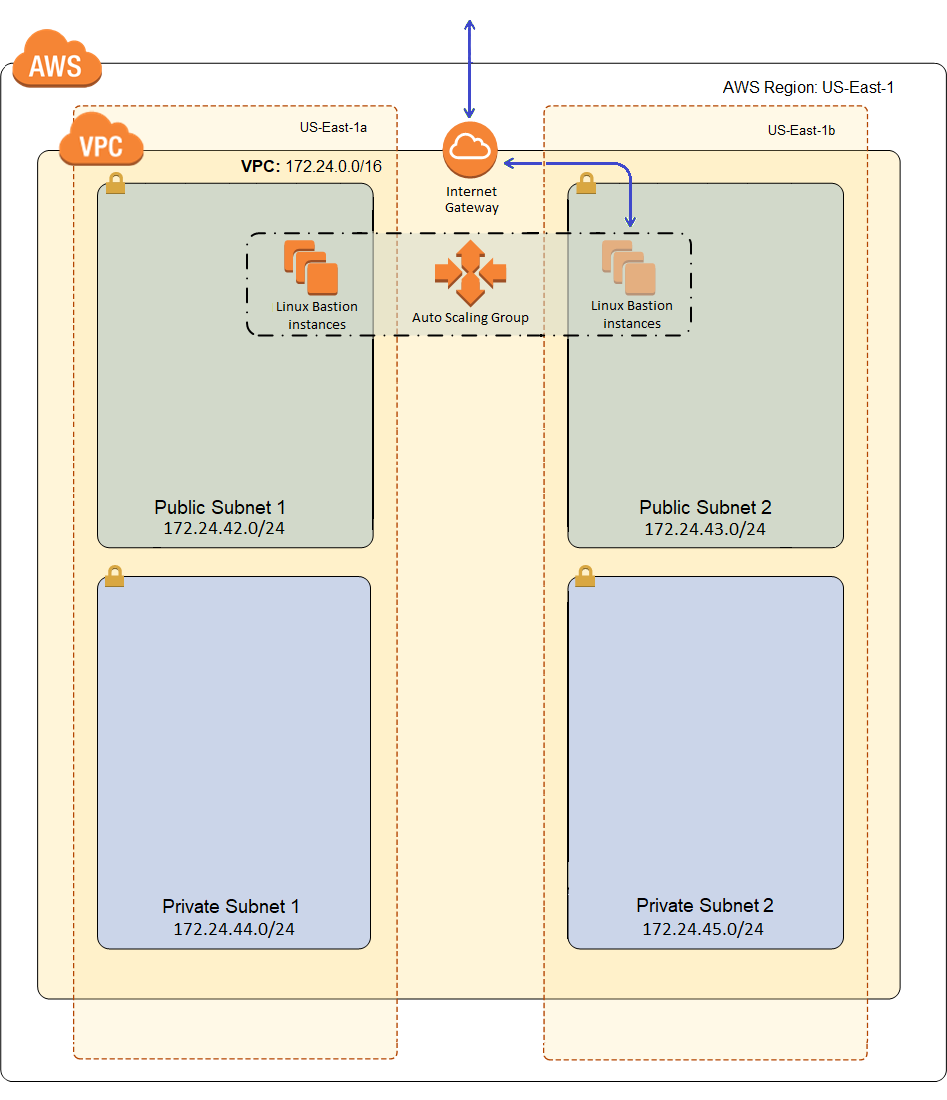
The blue line represents a direct connection from the Internet. As I build out my workload, I’ll use green lines to indicate less direct routes into and out of the network, and there’s really only going to be one more blue line when we’re done, for web traffic coming into my load balancer. The only direct route into my network, at least for administrative purposes, will be to the Bastion Host. There will of course also be HTTP traffic into my network, but that will go through an application load balancer and AWS Shield standard will protect me from common denial of service attacks, so I’ll call that a less direct route with numerous safe-guards.
So I’ll need to concentrate some effort on securing that one blue line. It’s a two step process. I need to stand up a bastion host and configure my security groups such that administrators can only connect into the bastion host from the Internet, and all other instances in the VPC only allow administrative connections from the bastion. Then I need to do a wee bit of hardening of the Bastion Host. Just provisioning the Bastion is looking like it’ll be a pretty big blog post, so I’ll probably do a short follow up that talks about hardening it, and of course we’ll talk about the other security groups in subsequent posts as we get to their resources.
I’m not going to describe in detail the sections of the template that I described in the previous post, like Parameters and Metadata. If you don’t understand those, go back and read the previous post, they’re not any different in this template than they were in the VPC template. So I’ll start by explaining the new sections of the template below and finish up with the resources section and how that looks when deploying an auto-scaling EC2 instance.
Rules
Our first new section is called rules. It allows us to perform some validation on our parameters, in addition to the validation we did in the Parameters section in my last post (Provisioning a VPC with CloudFormation in AWS). The rules section looks like this:
1 2 3 4 5 6 7 8 9 10 11 12 13 14 15 16 17 18 19 | "Rules": { "SubnetsInVPC": { "Assertions": [{ "Assert": { "Fn::EachMemberIn": [{ "Fn::ValueOfAll": [ "AWS::EC2::Subnet::Id", "VpcId" ] }, { "Fn::RefAll": "AWS::EC2::VPC::Id" } ] }, "AssertDescription": "All subnets must exist in the VPC" }] } } |
This has one rule, which validates that the subnet parameter contains only subnets that are in the same VPC we’re deploying to. Each rule contains one or more assertions, which consist of a true/false statement and a description. In this case, the true false statement uses an intrinsic function called Fn::EachMemberIn, which takes in two lists and returns true if each member of the first list appears in the second list. The first list is generated by Fn::ValueOfAll, which get’s the VpcId property from each subnet parameter. The second list is just the current VPC id, or a list of one.
Mappings
Mappings just allow you to create a lookup of sorts. You’re just mapping a key (string) to a value (object). So my first mapping looks like this:
1 2 3 4 5 6 7 8 9 10 11 12 13 14 | "InstanceType2Architecture": { "t1.micro": { "Arch": "HVM64" }, "t2.nano": { "Arch": "HVM64" }, "t3.nano": { "Arch": "HVM64" }, "t3.micro": { "Arch": "HVM64" } } |
This mapping maps an instance type to a hardware virtualization architecture. I’m only supporting one architecture in this template, which is HVM64 (generally recommended for most new workloads in AWS). I’ve removed a bunch of instance types in what I’m showing above because it’s just more of the same.
My second mapping maps a region to an architecture and an Amazon Machine Image (AMI). I have two architectures defined, HVM64 or HVMG2, but like I said above I’m currently only supporting HVM64 in this template. I only left HVMG2 to remind myself that I might want to look back at that later, but I didn’t put in any valid AMIs so if you did select one of them, the template would fail to instantiate (but I didn’t give you the option to select one so don’t worry about that). Here is that second mapping in full:
1 2 3 4 5 6 7 8 9 10 11 12 13 14 15 16 17 18 19 20 21 22 23 24 25 26 27 28 29 30 31 32 33 34 35 36 37 38 39 40 41 42 43 44 45 46 47 48 49 50 51 52 53 54 55 56 57 58 59 60 61 62 63 64 65 66 | "Region2ArchitectureAmi": { "eu-north-1": { "HVM64": "ami-3f36be41", "HVMG2": "NOT_SUPPORTED" }, "ap-south-1": { "HVM64": "ami-0d2692b6acea72ee6", "HVMG2": "NOT_SUPPORTED" }, "eu-west-3": { "HVM64": "ami-0adcddd3324248c4c", "HVMG2": "NOT_SUPPORTED" }, "eu-west-2": { "HVM64": "ami-0d8e27447ec2c8410", "HVMG2": "NOT_SUPPORTED" }, "eu-west-1": { "HVM64": "ami-0bbc25e23a7640b9b", "HVMG2": "NOT_SUPPORTED" }, "ap-northeast-2": { "HVM64": "ami-095ca789e0549777d", "HVMG2": "NOT_SUPPORTED" }, "ap-northeast-1": { "HVM64": "ami-0c3fd0f5d33134a76", "HVMG2": "NOT_SUPPORTED" }, "sa-east-1": { "HVM64": "ami-058943e7d9b9cabfb", "HVMG2": "NOT_SUPPORTED" }, "ca-central-1": { "HVM64": "ami-0d4ae09ec9361d8ac", "HVMG2": "NOT_SUPPORTED" }, "ap-southeast-1": { "HVM64": "ami-01f7527546b557442", "HVMG2": "NOT_SUPPORTED" }, "ap-southeast-2": { "HVM64": "ami-0dc96254d5535925f", "HVMG2": "NOT_SUPPORTED" }, "eu-central-1": { "HVM64": "ami-0cc293023f983ed53", "HVMG2": "NOT_SUPPORTED" }, "us-east-1": { "HVM64": "ami-0b898040803850657", "HVMG2": "NOT_SUPPORTED" }, "us-east-2": { "HVM64": "ami-0d8f6eb4f641ef691", "HVMG2": "NOT_SUPPORTED" }, "us-west-1": { "HVM64": "ami-056ee704806822732", "HVMG2": "NOT_SUPPORTED" }, "us-west-2": { "HVM64": "ami-082b5a644766e0e6f", "HVMG2": "NOT_SUPPORTED" } } |
The whole purpose of these mappings is to define a resource property that will grab a value based on some parameter. In this case, the user selects an instance type, and we’ll use that to lookup the architecture. Then well use the current region and that architecture to select an appropriate AMI id. Without mappings, it would be impossible to write a CloudFormation template that works across all regions because AMIs are region specific, at least without asking them to select an AMI, and that wouldn’t work so well because my bootstrap code probably depends on having a specific operating system (and architecture).
There are many sample CloudFormation templates out there. There are even many Bastion Host CloudFormation templates out there. So why did I write my own? Two reasons:
- I believe that if you’re going to use a technology like this, you’d better understand it top to bottom or you will get bit.
- All of the templates that are out there are pretty dated. They use old AMIs for Amazon Linux instead of Amazon Linux 2 (the latest). Support for Amazon Linux will end sometime next year, it doesn’t make sense to use if for new workloads at this point.
But to get to where I want to be, I have to update all of those AMI ids, and how do I do that. I ran the following AWS CLI code, which prints the AMI ids for Amazon Linux 2 for each region to which I have access:
1 2 3 4 5 | for region in `aws ec2 describe-regions --output text | cut -f3` do AMI=`aws ec2 describe-images --region $region --owners amazon --filters 'Name=name,Values=amzn2-ami-hvm-2.0.????????-x86_64-gp2' 'Name=state,Values=available' --output json | jq -r '.Images | sort_by(.CreationDate) | last(.[]).ImageId'` echo '"'$region'": { "HVM64": "'$AMI'", "HVMG2": "NOT_SUPPORTED" },' done |
The output looks like this:
1 2 3 4 5 6 7 8 9 10 11 12 13 14 15 16 | "eu-north-1": { "HVM64": "ami-3f36be41", "HVMG2": "NOT_SUPPORTED" }, "ap-south-1": { "HVM64": "ami-0d2692b6acea72ee6", "HVMG2": "NOT_SUPPORTED" }, "eu-west-3": { "HVM64": "ami-0adcddd3324248c4c", "HVMG2": "NOT_SUPPORTED"}, "eu-west-2": { "HVM64": "ami-0d8e27447ec2c8410", "HVMG2": "NOT_SUPPORTED" }, "eu-west-1": { "HVM64": "ami-0bbc25e23a7640b9b", "HVMG2": "NOT_SUPPORTED" }, "ap-northeast-2": { "HVM64": "ami-095ca789e0549777d", "HVMG2": "NOT_SUPPORTED" }, "ap-northeast-1": { "HVM64": "ami-0c3fd0f5d33134a76", "HVMG2": "NOT_SUPPORTED" }, "sa-east-1": { "HVM64": "ami-058943e7d9b9cabfb", "HVMG2": "NOT_SUPPORTED" }, "ca-central-1": { "HVM64": "ami-0d4ae09ec9361d8ac", "HVMG2": "NOT_SUPPORTED" }, "ap-southeast-1": { "HVM64": "ami-01f7527546b557442", "HVMG2": "NOT_SUPPORTED" }, "ap-southeast-2": { "HVM64": "ami-0dc96254d5535925f", "HVMG2": "NOT_SUPPORTED" }, "eu-central-1": { "HVM64": "ami-0cc293023f983ed53", "HVMG2": "NOT_SUPPORTED" }, "us-east-1": { "HVM64": "ami-0b898040803850657", "HVMG2": "NOT_SUPPORTED" }, "us-east-2": { "HVM64": "ami-0d8f6eb4f641ef691", "HVMG2": "NOT_SUPPORTED" }, "us-west-1": { "HVM64": "ami-056ee704806822732", "HVMG2": "NOT_SUPPORTED" }, "us-west-2": { "HVM64": "ami-082b5a644766e0e6f", "HVMG2": "NOT_SUPPORTED" } |
I then take this and overwrite the whole second mapping with it and I’m now working with Amazon Linux 2. If I change the filters, I can use basically the same code to generate a map for any other type of AMI I want to use in my template. The only downside is, that my template only supports regions I have access to. And my account is pretty new, so there are some regions I don’t currently have access to (there are only 16 regions in my map). If you want to use this template in a region I don’t have, you’ll need to extend this map to cover your region. You can use the CLI code above to get the AMI ids for your region. The regions I’m missing appear to be Asia Pacific (Hong Kong) (ap-east-1), EU (Stockholm) (eu-north-1), and Middle East (Bahrain) (me-south-1), and of course anything in GovCloud.
I’ll demonstrate how the mappings are used when I get to the resources for our Bastion auto-scaling group below.
Conditions
The last new section is called conditions. It’s pretty simple, and it looks like this:
1 2 3 4 5 6 7 8 9 10 11 12 13 14 15 16 | "Conditions": { "CreateIAMRole": { "Fn::Equals": [{ "Ref": "AlternativeIAMRole" }, "" ] }, "CreateSecurityGroup": { "Fn::Equals": [{ "Ref": "AlternativeSecurityGroupId" }, "" ] } } |
Conditions are used to either conditionally provision certain resources, or to provisionally configure resource properties, based in some fashion on user input in the form of parameters.
The first condition is called CreateIAMRole. It just returns true if the parameter AlternativeIAMRole is blank. It is attached to the role resource as we’ll see below, so if the user entered an IAM role parameter, we won’t create that resource, we’ll just use what was passed. The second condition just does the same thing for the security group for the bastion instances. We’ll see how they’re used below as it’s now time to talk about the resources.
Bastion Resources
There are a couple of resources that I’m usually going to want for any EC2 instance or group of instances, namely a security group and an IAM role for the instances. Then of course, we’re going to need an auto-scaling group and a launch configuration in order to get the auto-healing behavior we’re looking for.
The Bastion Security Group
The Bastion scaling group just allows a single inbound port, tcp port 22 (SSH). So it looks like this:
1 2 3 4 5 6 7 8 9 10 11 12 13 14 15 16 17 18 19 20 21 22 23 24 25 26 27 28 29 30 31 32 33 34 35 36 | "BastionSecurityGroup": { "Condition": "CreateSecurityGroup", "Type": "AWS::EC2::SecurityGroup", "Properties": { "GroupDescription": "ssh", "VpcId": { "Ref": "VpcId" }, "SecurityGroupIngress": [{ "CidrIp": { "Ref": "SshSourceCidr" }, "IpProtocol": "tcp", "FromPort": 22, "ToPort": 22 }], "Tags": [{ "Key": "Name", "Value": "BastionSG" }, { "Key": "StackName", "Value": { "Fn::Sub": "${AWS::StackName}" } }, { "Key": "Network", "Value": "Public" } ] } } <p> Note the condition of <span style="color:maroon">"CreateSecurityGroup"</span>, so we're only going to create a security group if one wasn't passed in as a parameter. If one was passed in as a parameter, it had better allow tcp inbound on port 2242 or our Bastion isn't going to work very well. </p> |
The Bastion Role
Now we need to define a role to be used by our instance, which looks like this:
1 2 3 4 5 6 7 8 9 10 11 12 13 14 15 16 17 18 19 20 21 22 23 24 25 26 27 28 29 30 31 32 33 34 35 36 37 38 39 40 41 42 43 44 45 46 47 48 49 50 51 52 53 54 55 56 57 58 59 60 61 62 63 64 65 66 67 68 69 70 71 72 73 | "BastionRole": { "Condition": "CreateIAMRole", "Type": "AWS::IAM::Role", "Properties": { "AssumeRolePolicyDocument": { "Version": "2012-10-17", "Statement": [{ "Effect": "Allow", "Action": "sts:AssumeRole", "Principal": { "Service": "ec2.amazonaws.com" } }] }, "Path": "/", "Policies": [{ "PolicyName": "IP_Bastion_Iam", "PolicyDocument": { "Version": "2012-10-17", "Statement": [{ "Action": "iam:ListUsers", "Resource": "*", "Effect": "Allow" }, { "Action": [ "iam:ListSSHPublicKeys", "iam:GetSSHPublicKey" ], "Resource": { "Fn::Sub": "arn:aws:iam::${AWS::AccountId}:user/*" }, "Effect": "Allow" }, { "Action": "iam:GetGroup", "Resource": "*", "Effect": "Allow" } ] } }, { "PolicyName": "IP_Bastion_Ec2", "PolicyDocument": { "Version": "2012-10-17", "Statement": [{ "Action": [ "ec2:DescribeTags" ], "Resource": "*", "Effect": "Allow" }, { "Condition": { "StringEquals": { "ec2:ResourceTag/StackName": { "Fn::Sub": "${AWS::StackName}" } } }, "Action": [ "ec2:CreateTags" ], "Resource": "*", "Effect": "Allow" } ] } } ] } } |
Piece of cake right, no explanation necessary! Or not. First, note that this resource is using the condition CreateIAMRole, which we know from our conditions means that this role only gets created if the parameter AlternativeIAMRole was left blank.
The first part of the role is the AssumeRolePolicyDocument, which describes who is allowed to assume this role. In this case that’s just the EC2 service, which is what’s required for any service role that you want to assign as an EC2 instance role.
Then there are two policies defined, one for IAM permissions and another for EC2 permissions.
The IAM policy allows ListUsers, ListSSHPublicKeys, GetSSHPublicKey, and GetGroup. The reason it needs these permissions is because we’re using aws-ec2-ssh, which is a set of scripts for managing administrative users and their authorized keys for remote SSH. You can read details from the link, but the gist is that it reads either all IAM users, or all users in a specified administrators group, and if they have a CodeCommit key it creates a local account for them and applies their CodeCommit key as an authorized key. This is why this template does not ask for a key pair in it’s parameters, because it does not create an ec2-user. What this means to you is that if you don’t have at least one IAM user with a CodeCommit key, you’ll never be able to access this Bastion host. I’ll describe this more in the section “Using this Template” below.
The EC2 policy allows DescribeTags and CreateTags. This is so the instance can read and update it’s name to include the Stack name on launch. The CreateTags permission has a condition that the StackName tag must be the same as our stack, which effectively locks it down to only other Bastion hosts in the same scaling group. This is just to lock it down to only what’s required. I would have done the same for DescribeTags, but conditions aren’t an option for that, which makes me sad :(.
The Bastion Instance Profile
In order to assign an IAM role to an instance, I also need to create a profile associated with that role. This is transparently done for you when you create a service role through the console, but when doing it through CloudFormation or the CLI, you must explicitly do it. So here is my instance profile:
1 2 3 4 5 6 7 8 9 10 11 12 13 14 15 16 | "BastionProfile": { "Type": "AWS::IAM::InstanceProfile", "Properties": { "Roles": [{ "Fn::If": [ "CreateIAMRole", { "Ref": "BastionRole" }, { "Ref": "AlternativeIAMRole" } ] }] } }, |
This simple declaration just creates a profile that is associated by reference with either the BastionRole I just created or the AlternativeIAMRole passed in as a parameter. Note that the profile itself is not conditionally created, regardless of where the role came from, I create a profile and associate it with the role.
And Finally, the Bastion
The Bastion itself consists of two parts, an auto-scaling group and a launch configuration.
The auto-scaling group just says launch between InstanceCapacity and 5 instances of the type described by the referenced resource LaunchConfig, which looks like this:
1 2 3 4 5 6 7 8 9 10 11 12 13 14 15 16 17 18 19 20 21 22 23 24 25 26 27 28 29 30 31 32 33 34 35 36 37 38 39 40 41 42 43 44 45 46 47 48 49 50 51 52 53 54 | "BastionScalingGroup": { "Type": "AWS::AutoScaling::AutoScalingGroup", "Properties": { "VPCZoneIdentifier": { "Ref": "PublicSubnets" }, "LaunchConfigurationName": { "Ref": "LaunchConfig" }, "MinSize": { "Ref": "InstanceCapacity" }, "MaxSize": "5", "DesiredCapacity": { "Ref": "InstanceCapacity" }, "Tags": [{ "Key": "Name", "Value": "Bastion", "PropagateAtLaunch": true }, { "Key": "StackName", "Value": { "Fn::Sub": "${AWS::StackName}" }, "PropagateAtLaunch": true }, { "Key": "Network", "Value": "Public", "PropagateAtLaunch": true } ] }, "CreationPolicy": { "ResourceSignal": { "Count": { "Ref": "InstanceCapacity" }, "Timeout": "PT15M" } }, "UpdatePolicy": { "AutoScalingRollingUpdate": { "MinInstancesInService": { "Ref": "InstanceCapacity" }, "MaxBatchSize": "1", "PauseTime": "PT15M", "WaitOnResourceSignals": "true" } } } |
Our last resource, the LaunchConfig does most of the heavy lifting of the template. It uses parameters and other resources to describe the individual instances that should be launched by the auto-scaling group, and it looks something like this:
1 2 3 4 5 6 7 8 9 10 11 12 13 14 15 16 17 18 19 20 21 22 23 24 25 26 27 28 29 30 31 32 33 34 35 36 37 38 39 40 41 42 43 44 45 46 47 | "LaunchConfig": { "Type": "AWS::AutoScaling::LaunchConfiguration", "Metadata": { *** } }, "Properties": { "ImageId": { "Fn::FindInMap": [ "Region2ArchitectureAmi", { "Ref": "AWS::Region" }, { "Fn::FindInMap": [ "InstanceType2Architecture", { "Ref": "InstanceType" }, "Arch" ] } ] }, "InstanceType": { "Ref": "InstanceType" }, "InstanceMonitoring": false, "IamInstanceProfile": { "Ref": "BastionProfile" }, "SecurityGroups": [{ "Fn::If": [ "CreateSecurityGroup", { "Ref": "BastionSecurityGroup" }, { "Ref": "AlternativeSecurityGroupId" } ] }], "UserData": { *** } } } |
First it defines the AMI that will be used for each instance. It does this by making use of nested maps from our mapping section above. First, it uses the instance type parameter to get back a virtualization architecture. Then it uses the combination of the current region and the virtualization architecture to get back an AMI id. You can theoretically use maps for whatever you can imagine, but this particular pattern of resolving instance type, to architecture, to AMI by region is the most common use of maps in CloudFormation.
Then it assigns the instance type, profile, and security groups. I’ve cut out some pretty big sections of the LuanchConfig, namely the MetaData and UserData. Those are hefty enough, and important enough, to warrant their own sections so I’ll dig into them a bit below.
Bootstrapping the Bastion
CloudFormation will only get you so far. It will spin up resources for you, but it doesn’t necessarily know what you specifically want to do with those instances. For that, you need to bootstrap your instances, meaning write some script which will configure them to meet your needs. For instance, if you’re using the instance as a web server. you might need to install and configure Apache, MySQL, and PHP, and spin up Apache. That’s what the next two sections are about, and they’re both pieces of the LaunchConfiguration resource we just defined.
The CloudFormation Initialization Configuration
First is the property AWS::CloudFormation::Init of the launch configuration metadata. It looks like this:
1 2 3 4 5 6 7 8 9 10 11 12 13 14 15 16 17 18 19 20 21 22 23 24 25 26 27 28 29 30 31 32 33 34 35 36 37 38 39 40 41 42 43 44 45 46 47 48 49 50 51 52 53 54 55 56 57 58 59 60 61 62 63 64 65 66 67 68 69 70 71 72 73 74 75 76 77 78 79 80 81 82 83 84 85 | "AWS::CloudFormation::Init": { "configSets": { "cfn_install": [ "install_cfn" ] }, "install_cfn": { "files": { "/etc/cfn/cfn-hup.conf": { "content": { "Fn::Join": [ "", [ "[main]\n", "stack=", { "Ref": "AWS::StackId" }, "\n", "region=", { "Ref": "AWS::Region" }, "\n" ] ] }, "mode": "000400", "owner": "root", "group": "root" }, "/etc/cfn/hooks.d/cfn-auto-reloader.conf": { "content": { "Fn::Join": [ "", [ "[cfn-auto-reloader-hook]\n", "triggers=post.update\n", "path=Resources.LaunchConfig.Metadata.AWS::CloudFormation::Init\n", "action=/sbin/aws-update-bastion.sh\n" ] ] }, "mode": "000400", "owner": "root", "group": "root" }, "/sbin/aws-update-bastion.sh": { "content": { "Fn::Join": [ "", [ "#!/bin/bash -xe\n", "\n", "echo $1\n", "\n", "# Update this script before updating the stack to perform custom logic within 15 minutes of the update\n", "yum -y update\n" ] ] }, "mode": "000700", "owner": "root", "group": "root" } }, "commands": { "aws_update_bastion": { "command": "/sbin/aws-update-bastion.sh MetadataVersion=6" } }, "services": { "sysvinit": { "cfn-hup": { "enabled": "true", "ensureRunning": "true", "files": [ "/etc/cfn/cfn-hup.conf", "/etc/cfn/hooks.d/cfn-auto-reloader.conf", "/sbin/aws-update-bastion.sh" ] } } } } |
This big blob of JSON is input to a helper script that facilitates bootstrapping instances called cfn-init. From the AWS documentation:
The cfn-init helper script reads template metadata from the AWS::CloudFormation::Init key and acts accordingly to:
Fetch and parse metadata from AWS CloudFormation
- Install packages
- Write files to disk
- Execute shell commands (I added this)
- Enable/disable and start/stop services
In this context, that big blob of JSON isn’t really that difficult to understand. It has a single property call configSets. I define a single config set called cfn_install. The name is arbitrary, I’m going to pass in the config set name when I call cfn-init, which will tell it which metadata to act upon, so:
1 | /opt/aws/bin/cfn-init -v --stack ${STACK_NAME} --resource LaunchConfig --configsets cfn_install --region ${REGION} |
tells cfn-init to look for the config set called cfn_install, in the metadata of the resource LaunchConfig. Each config set is just one or more properties of AWS::CloudFormation::Init, each of which may have up to 4 sub-properties: packages, files, commands, and services. The files property defines files we want cfn_init to create or overwrite. Commands are just shell commands we want it to execute. And services are just systemd services that we want it to start up. The packages property, which I’m not actually using, list yum packages that should be installed. I found it easier to do that in my bootstrap script below.
What I’m doing here is initializing another helper script called cfn-hup, which we’re going run as a daemon. It will get called whenever that launch configuration metadata changes (as a result of an update to the stack). So I lay down 3 files for cfn-hup to use. Two of them are cfn-hup configuration files and the third is a script which I’m telling cfn-hup to call any time it detects changes in the metadata. My script is then responsible for responding to those changes. Now cfn-hup doesn’t really get called when there are changes to the metadata. That was just me spouting the party line, because that’s the way to documentation makes it sound, but it actually polls for changes, and it does it every 15 minutes. So when I deploy an update, my cfn-hup action script will actually get called sometime within 15 minutes of the change.
I only included one rather whimsical command, which is to call the same script that I configured as the action for cfn-hup, passing in a version number which serves no purpose other than to allow me to make a change to it to see how this stuff really works. The script just does a yum update. If I increment the version number and update the stack, I can then “tail -f” the file /var/logs/cfn-hup.log, and sometime in the next 15 minutes I’ll see it spin up and run my yum update.
Anyway, I’m not necessarily doing anything all that useful here, but often you will want to do something each time a template gets updated, and this is one way to achieve that.
The Bastion User Data
And finally, there’s the user data. This is just a bit of script that gets called once the first time a new instance is spun up from a launch configuration. Because it’s a language in a language (i.e. bash script inside of JSON), it’s pretty ugly, so personally I like to keep these short. I just download a bootstrap script and then execute it. If I need to pass parameters to it, I export them as environment variables first.
The advantage of this is that when I’m writing my script I can quickly run it over and over until I get it right, instead of having to wait 5 or 15 or more minutes while I redeploy the CloudFormation stack only to find out that I misspelled grep as gerp, so fix that and rinse and repeat (not that that’s ever happened…ugh!). Of course, once I have it right, I could go ahead and encode it in a JSON join, but that’s a PITA. There are disadvantages to this approach too, which I’ll get to in a moment, but here is my user data:
1 2 3 4 5 6 7 8 9 10 11 12 13 14 15 16 17 18 19 20 21 22 23 24 | "Fn::Base64": { "Fn::Join": [ "", [ "#!/bin/bash -xe\n", "\n", "echo UserDataVersion=4", "\n", "export ADMIN_GROUP=", { "Ref": "AdministratorsGroup" }, "\n", "export MOTD_BANNER=", { "Ref": "MotdBanner" }, "\n", "wget --no-cache -O /tmp/bootstrap-bastion.sh https://raw.githubusercontent.com/mcsheaj/wordpress-high-availability-blog/master/scripts/bootstrap-bastion.sh \n", "chmod 700 /tmp/bootstrap-bastion.sh\n", "/tmp/bootstrap-bastion.sh\n" ] ] } |
As I said, this gets executed exactly once the first time an instance is spun up. So if I update the stack and CloudFormation sees that I’ve changed this script, it will spin up new instances and when they’re ready, terminate the old ones. But it won’t detect changes to the bootstrap script I’m downloading of course, that’s the disadvantage to this approach of performing most of my bootstrapping in an external script. So my script has the instruction “echo UserDataVersion=4” in it, which seems kind of silly, but if I bump that number to 5 CloudFormation sees that as a change and does it’s thing.
The Bootstrap Script
And finally, there is the bootstrap script that I’m downloading, which I’ll explain in pieces.
This first section just initializes a couple of variables from instance metadata.
1 2 3 4 5 6 7 | #!/bin/bash -xe cd /tmp # Populate some variables from meta-data INSTANCE_ID=$(curl http://169.254.169.254/latest/meta-data/instance-id) REGION=$(curl http://169.254.169.254/latest/dynamic/instance-identity/document|grep region|awk -F\" '{print $4}') |
Next I create a tag called Bootstrap using the AWS CLI with a value of roughly the time my bootstrap process began. I do this so I know when it makes sense to try to SSH into my instance. Without this I have a tendency to get very impatient staring at the console, willing the instance to come up.
1 2 3 | # Create a bootstrap tag BOOTSTRAP=$(date +"BEGIN: %Y-%m-%d %H:%M:%S %Z") aws ec2 create-tags --resources ${INSTANCE_ID} --tags Key=Bootstrap,Value=${BOOTSTRAP} --region ${REGION} |
Next it runs the aws-ec2-ssh installation script to generate administrative accounts for IAM users with CodeDeploy keys defined. It updates the Bootstrap tag as well, so looking at the console, I now know I can login with my SSH key. This step takes a tad longer than might be expected (about 8 to 10 seconds), because it installs git using yum and then gets the whole repository from github. I could probably individually download all of the files as raw files from github using wget and it would probably be quite a bit faster. Perhaps I’ll look into that later.
1 2 3 4 5 6 7 8 9 10 11 12 | # Create user accounts for administrators wget --no-cache https://raw.githubusercontent.com/mcsheaj/aws-ec2-ssh/master/install.sh chmod 755 install.sh yum -y install git if ! [ -z "${ADMIN_GROUP}" ] then ./install.sh -i ${ADMIN_GROUP} -s ${ADMIN_GROUP} else ./install.sh -s '##ALL##' fi BOOTSTRAP=$(date +"SSHEC2: %Y-%m-%d %H:%M:%S %Z") aws ec2 create-tags --resources ${INSTANCE_ID} --tags Key=Bootstrap,Value=${BOOTSTRAP} --region ${REGION} |
Next I use yum to install a package call jq, which provides a command-line utility that allows shell scripts to parse JSON. I also initialize a couple more variables I’m going to need using jq. I prefer to parse JSON output from the CLI rather than text output. The text output is just a bit too likely to change in future CLI versions breaking my script.
1 2 3 4 5 6 | # Install jq yum -y install jq # Populate some variables from CLI (need jq first) NAME=$(aws ec2 describe-tags --region us-east-1 --filters "Name=key,Values=Name" "Name=resource-id,Values=${INSTANCE_ID}" | jq .Tags[0].Value -r) STACK_NAME=$(aws ec2 describe-tags --region us-east-1 --filters "Name=key,Values=StackName" "Name=resource-id,Values=${INSTANCE_ID}" | jq .Tags[0].Value -r) |
Next, if the environment variable MOTD_BANNER is defined, the script tries to download it and update the system message of the day:
1 2 3 4 5 6 7 8 9 | # Update the motd banner if ! [ -z "${MOTD_BANNER}" ] then wget --no-cache -O /etc/update-motd.d/30-banner ${MOTD_BANNER} update-motd --force update-motd --disable else echo "No MOTD_BANNER specified, skipping motd configuration" fi |
Next it updates the Name property/tag of this instance, tacking onto it the stack name. This is useful if I want to deploy multiple copies of this stack, like dev, test, and prod.
1 2 3 4 5 6 7 8 | # Update the instance name to include the stack name if [[ ${NAME} != *-${STACK_NAME} ]] then NEW_NAME="${NAME}-${STACK_NAME}" aws ec2 create-tags --resources ${INSTANCE_ID} --tags Key=Name,Value=$NEW_NAME --region $REGION else NEW_NAME=${NAME} fi |
Run yum to get critical updates.
1 2 | # Run system updates yum -y update |
And finally, we’ll call the cfn-init helper script, and also the cfn-signal helper script. The former creates the files, installs the packages, runs the commands, and starts the services we configured in the LaunchConfig metadata earlier. I pass it the resource name from which to read the metadata and the config set to execute from that metadata. The latter sends a signal to CloudFormation telling it we’re good to go. Looking back at the auto-scaling group from above, the CreationPolicy and the UpdatePolicy tell CloudFormation the maximum amount of time to wait for this signal. If it doesn’t receive the signal within the allotted time, it will roll back the stack completely. If you just don’t specify a CreationPolicy or UpdatePolicy, CloudFormation won’t expect a signal at all and will never roll back for not receiving one, which can be useful when trying to debug problems with your bootstrap logic. I also update my bootstrap tag so I can easily tell in the console that my bootstrap has finished.
1 2 3 4 5 6 7 8 9 10 11 | # Call cfn-init, which reads the launch configration metadata and uses it to # configure and runs cfn-hup as a service, so we can get a script run on updates to the metadata /opt/aws/bin/cfn-init -v --stack ${STACK_NAME} --resource LaunchConfig --configsets cfn_install --region ${REGION} # Send a signal indicating we're done /opt/aws/bin/cfn-signal -e $? --stack ${STACK_NAME} --resource BastionScalingGroup --region ${REGION} || true # Update the bootstrap tag BOOTSTRAP=$(date +"END: %Y-%m-%d %H:%M:%S %Z") aws ec2 create-tags --resources ${INSTANCE_ID} --tags Key=Bootstrap,Value=${BOOTSTRAP} --region ${REGION} |
Using the Template
As I’ve mentioned, this bastion host uses aws-ec2-ssh to generate local user accounts on the Linux box for IAM users who have an SSH key configured for CodeCommit (optionally in a specific administers groups). So before deploying this, you should have at least one such IAM user. The document – Setup Steps for SSH Connections to AWS CodeCommit Repositories on Windows, provides instructions for generating an SSH key for Windows users. You don’t need to follow all of the directions on this page, just the ones for generating the SSH key and uploading it (and installing git for windows if you don’t already have an ssh-keygen script).
So to launch this, I go into CloudFormation and hit create stack. I load my JSON template from a file, and here is how I configure the stack parameters:
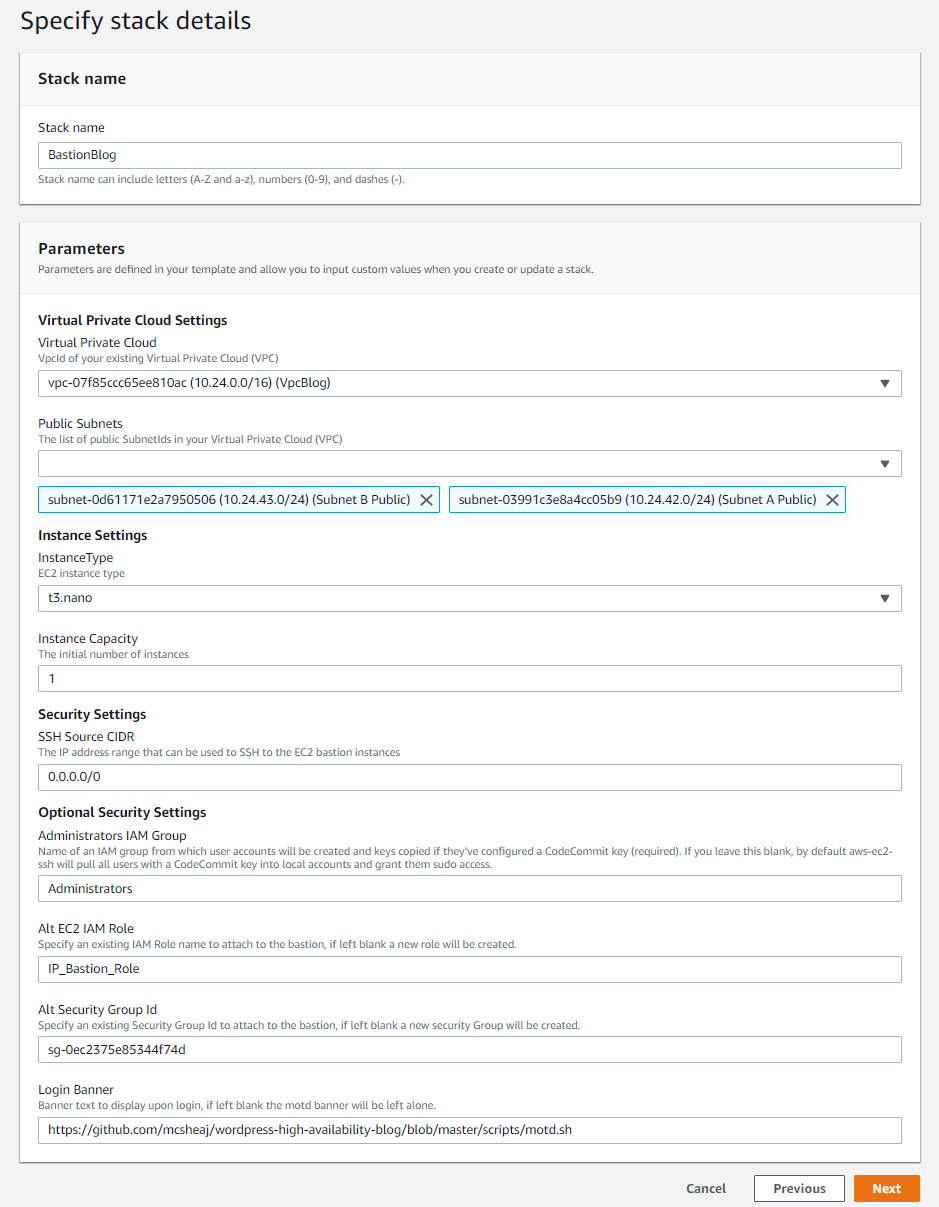
At this point, my blog is up as a production environment, so I’m not messing with that for this blog post. I’ve deployed a new VPN for the blog post, with a different CIDR address range, to act as my test environment. I just transformed 172 into 10, so the VPC CIDR range changed from 172.24.0.0/16 to 10.24.0.0/16. My pictures still describe production, so just mentally transform 172 to 10 when looking at the pictures and we’re all caught up. Naturally, I choose the two public subnets from this CIDR range for this deployment.
The last 4 parameters are all optional. They are:
- I put in an IAM group name so aws-ec2-ssh will only create accounts for users in this group (and who have a CodeCommit key of course). If left blank, it will create an account for any IAM user with a CodeCommit key.
- I pass in the name of an IAM role instead of having it create one. If you’re going to do this, you need to make sure this role has at least the permissions described by the template role, or the instance won’t bootstrap correctly. Why create the role manually? Because if I don’t, it will create a role called something like BastionRole-JumpBoxBlog-12059714. And if I deploy to dev and prod, it will create two new roles with two new random suffixes, and that’s going to get annoying. And I might want to share a single role between all 3 environments, IAM roles aren’t regional.
- I also manually created the security group and passed it in for much the same reason. For instance, my security group is call SshBlog. It may be more logical to have security groups based on functionality (i.e. Ssh and WebServer) rather than machine type (i.e. Bastion and Nat). Then I can assign this group to any instance that needs SSH on port 22, and just assign multiple security groups to any machine that needs more complex port access. In this particular case that makes less sense, because I’m allowing SSH from the world because I don’t know where I’m going to be when I need to perform administration, and I’m probably not going to allow that on any other box (or else, why have a Bastion?).
- And finally, I pass in the raw github path to a motd banner I want the instance to use.
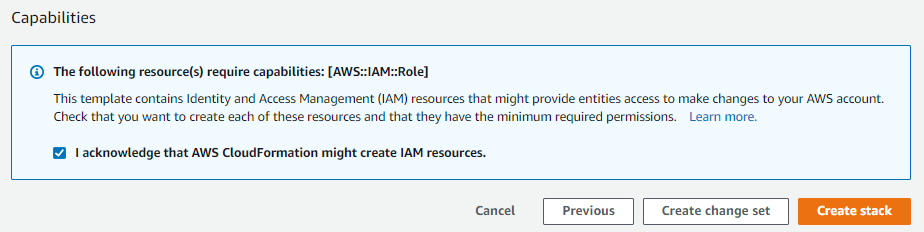
Then hit Next and Next again, check the box at the bottom of the last page acknowledging that this template might create IAM resources, and hit Create Stack.
And after a few minutes, you should have a new bastion host deployed. You can keep an eye on it’s progress on the Stack -> Events tab.
Sum Up
I’ve really just scratched the surface of creating a Bastion host, but this post is pretty long and I have to call it quits at some point. Sure, I’ve created a jump box, but I haven’t really done any hardening of the OS, which is important for any server, but especially so for a Bastion host. I’ll follow up shortly with a hopefully shorter post covering a brief introduction to those topics.
Reference
- CloudFormation Template Constraint Rules
- CloudFormation Template Conditions
- Manage AWS EC2 SSH access with IAM
- Setup Steps for SSH Connections to AWS CodeCommit Repositories on Windows
- Connecting to Your Linux Instance from Windows Using PuTTY