
This post is about a detailed examination of a CloudFormation template for provisioning a Virtual Private Cloud (VPC) in Amazon AWS. It is the first of what will be a series of posts that talk about Infrastructure as Code, revolving around trying to accomplish some particular thing. In particular, I’m moving my blog (this blog) to AWS from a shared hosting provider, and my experiences doing that is what this series will be about.
I have some specific goals in moving my blog, like my current service is a bit slower than I would like, and also less reliable (only 2 nines of availability), so I was looking to upgrade either way. Looking at the next step up in shared hosting, it would cost about twice as much as I’m currently spending (around $400/year), so I would ideally like to come up with something on AWS that isn’t much more than that, but with improved reliability and maybe speed. I have no idea starting out if I can actually meet any of these goals.
What I’m trying to build looks something like this:
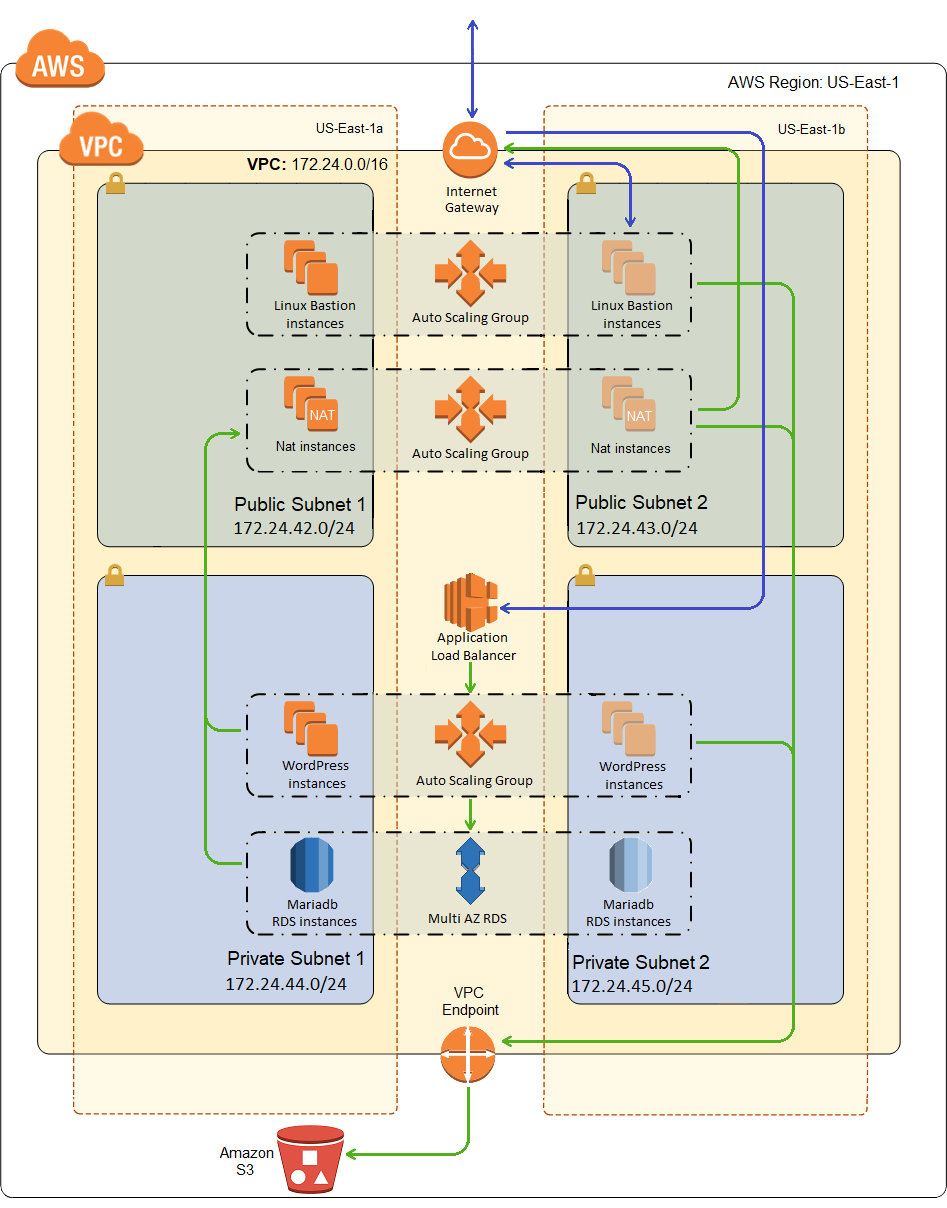
And right off the bat, that looks fairly frightening to me. It’s not really, but it’s a lot to bite off at once if you’re just getting started with AWS.
In truth, however, I’m not really just starting off as I write this, in fact by the time you read this post my blog will already be running on AWS. If you happened to come to my blog sometime in August and it was down…sorry, there was a bit of a learning curve in the transition ;). But in either case, if you want to build something like this and you don’t know where to start, start small. So this post is only going to describe a template to deploy the networking backbone for a two tiered application with high availability. Basically, that’s what a VPC is. Think of it like a corporate network. But more specifically, like the portion of a corporate network at a single location, or at least a group of locations in close proximity that don’t have to reach out to the Internet to talk to one another.
And that looks like this:
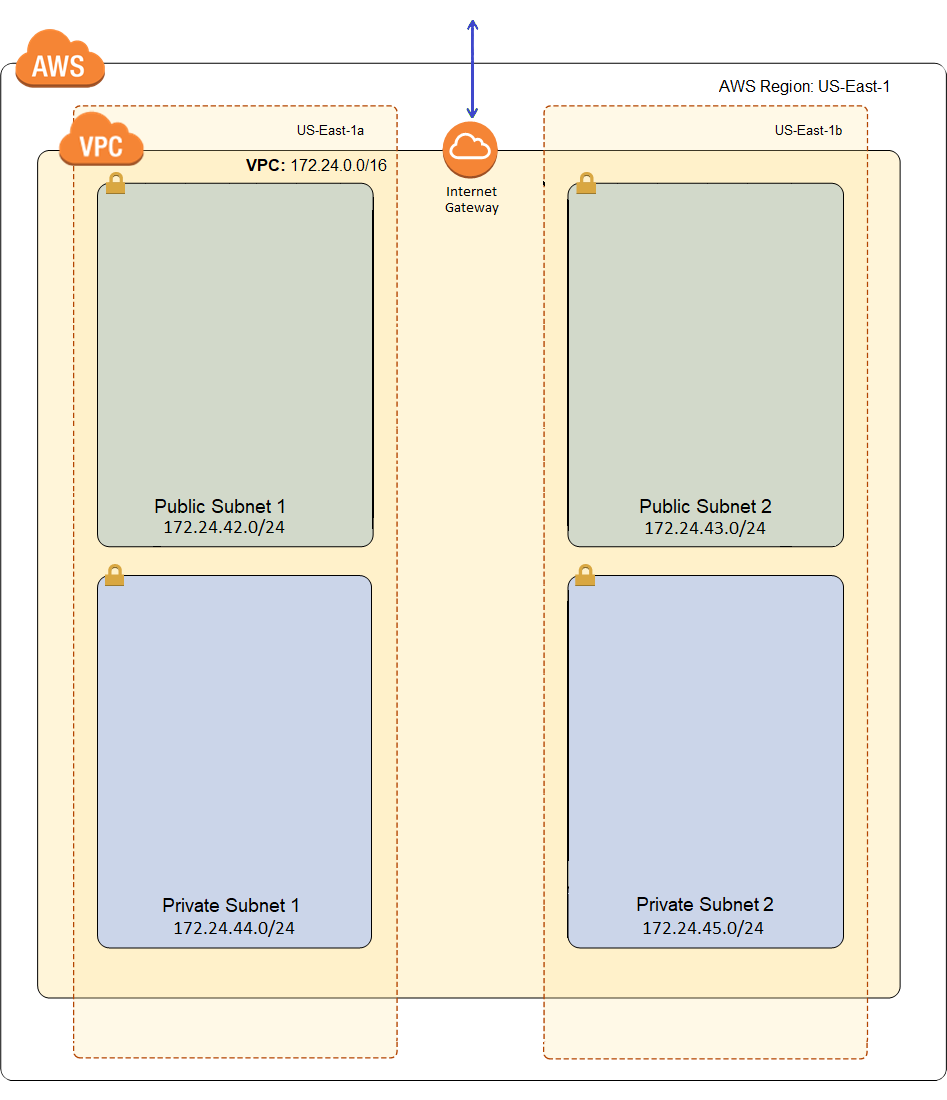
That’s a wee bit better. What I’m after is the networking infrastructure for a two tier application. And for resiliency, I want to provision it across two different availability zones. Now I’ve seen some wonderful templates out there that will let me do two to four or even more availability zones, using conditional resources, and that’s great, but a thousand plus lines of JSON (possibly multiple thousands) and split across several files, and I got tired just perusing them. I’d like to start a bit simpler. There are also some other reasons I rejected these templates besides complexity, but that’s best left for another blog post (probably one of the next couple posts in this series, I think they call that foreshadowing).
So I’m going to start off with a template that builds out a two tier network in 2, and only 2, availability zones. That simplification allowed me to do this template in about 600 lines of JSON, which is quite a bit smaller than most of the similar sample templates I found. It’s actually only a bit more than 300 lines of YAML, which I guess is arguably a point in the favor of YAML, but the difference is mostly formatting and white space and white space is free and makes stuff easier to read in my opinion. Now having the smallest template isn’t exactly the most important thing, especially if you get there by leaving out important stuff, but it is pretty helpful when you’re writing a blog post that is going to attempt to describe that template in nauseating detail.
Note that nowhere in this post am I going to mention the shared hosting provider I was using, because this isn’t a hosting provider bashing blog. I was on an introductory level shared hosting plan. So when I say that neither speed nor reliability was quite as good as I would like, one option would have been to upgrade to a better plan with the same provider. When you’re on an introductory level shared hosting plan, you can’t expect 4 nines of availability or lightning fast page load times. You get what you pay for. And by using WP Super Cache, I was able to get the page load times for cached pages down to a respectable 2.5 seconds, so my hosting provider wasn’t terrible, but I was ready to upgrade.
The CloudFormation Template for my VPC
The basic format of a CloudFormation template is pretty simple and looks like this:
1 2 3 4 5 6 7 8 9 10 11 12 | { "AWSTemplateFormatVersion": "2010-09-09", "Description": "VPC: public and private subnets in two availability zones.", "Metadata": { }, "Parameters": { }, "Resources": { }, "Outputs": { } } |
Now the devil’s in the details, and the details are in those 4 empty properties above, Metadata, Parameters, Resources, and Outputs. All of these sections are optional except the resources section, but you’ll actually use most of them in most templates. There are actually several other optional sections that are not used in this template. I’ll discuss them as I get to them in other blog posts in this series.
Also, now is a good time to mention that I’m a long time developer, so I’m very comfortable with JSON. And also fairly appalled by any language that treats white space as significant, so I’m not overly fond of YAML. Those are the two options for writing CloudFormation templates. And JSON appears to be an unpopular choice among CloudFormation practitioners these days, but all of my CloudFormation templates will be in JSON. If you prefer YAML, there’s no need for us to argue about the relative virtues of one over the other. The CloudFormation designer in the AWS console will seamlessly convert back and forth between the two in a split second, so use whichever syntax you like. Besides, I’ll probably just include both formats in the download to try and make everyone happy, but I’ll be showing the JSON version in this post.
VPC Parameters
I’ll start off with parameters, because it will control much of how users of the template will interact with a template and customize it to their particular use case. So well thought out parameters can be the difference between a good CloudFormation template and a bad one. Here is the parameters section of my template:
1 2 3 4 5 6 7 8 9 10 11 12 13 14 15 16 17 18 19 20 21 22 23 24 25 26 27 28 29 30 31 32 33 34 35 36 37 38 39 40 41 | "Parameters": { "AvailabilityZones": { "Description": "List of Availability Zones to use for the subnets in the VPC. Note: The logical order is preserved and only 2 AZs are used for this deployment.", "Type": "List<AWS::EC2::AvailabilityZone::Name>" }, "VPCCIDR": { "AllowedPattern": "^([0-9]{1,3}\\.){3}[0-9]{1,3}(\\/([0-9]|[1-2][0-9]|3[0-2]))?$", "ConstraintDescription": "CIDR block parameter must be in the form x.x.x.x/16-28", "Default": "172.24.0.0/16", "Description": "CIDR Block for the VPC", "Type": "String" }, "PublicSubnetACIDR": { "AllowedPattern": "^([0-9]{1,3}\\.){3}[0-9]{1,3}(\\/([0-9]|[1-2][0-9]|3[0-2]))?$", "ConstraintDescription": "CIDR block parameter must be in the form x.x.x.x/16-28, and of course must fall within the VPC CIDR.", "Default": "172.24.42.0/24", "Description": "CIDR Block for the public DMZ subnet 1 located in Availability Zone 1", "Type": "String" }, "PrivateSubnetACIDR": { "AllowedPattern": "^([0-9]{1,3}\\.){3}[0-9]{1,3}(\\/([0-9]|[1-2][0-9]|3[0-2]))?$", "ConstraintDescription": "CIDR block parameter must be in the form x.x.x.x/16-28, and of course must fall within the VPC CIDR.", "Default": "172.24.44.0/24", "Description": "CIDR block for private subnet 1 located in Availability Zone 1.", "Type": "String" }, "PublicSubnetBCIDR": { "AllowedPattern": "^([0-9]{1,3}\\.){3}[0-9]{1,3}(\\/([0-9]|[1-2][0-9]|3[0-2]))?$", "ConstraintDescription": "CIDR block parameter must be in the form x.x.x.x/16-28, and of course must fall within the VPC CIDR.", "Default": "172.24.43.0/24", "Description": "CIDR Block for the public DMZ subnet 2 located in Availability Zone 2", "Type": "String" }, "PrivateSubnetBCIDR": { "AllowedPattern": "^([0-9]{1,3}\\.){3}[0-9]{1,3}(\\/([0-9]|[1-2][0-9]|3[0-2]))?$", "ConstraintDescription": "CIDR block parameter must be in the form x.x.x.x/16-28, and of course must fall within the VPC CIDR.", "Default": "172.24.45.0/24", "Description": "CIDR block for private subnet 2 located in Availability Zone 2.", "Type": "String" } }, |
Here, I have 6 parameters I’m going to prompt the user for before they can instantiate the template. The first is the most interesting one because it’s type is “List<AWS::EC2::AvailabilityZone::Name>”. This is going to provide a multiple selection box in which the user can select one or more availability zones from the possible availability zones in the region the user is in according to the AWS console.
Unfortunately, this isn’t ideal for my template, or should I say my template isn’t ideal for this control. That’s because the user can select anywhere from one to six availability zones (in the us-east-1 region that is) and I don’t know how to prevent that through validation. Anyway, if they select more than two zones, the first two are used. If they select one zone, the stack will error out when instantiated. That’s because my template is hard-coded for two zones. It’s also why it would be better if the template allowed 1 to 6 zones or something like that, but we’re keeping it simple for now.
The rest of my parameters are all of type string, but they have some additional properties that help validate the user input. They have an allowed pattern, which is just a regular expression which will be tested against the user input and raise an error if the test fails. They also have a constraint description, which is the validation error message that is to be displayed to the user on such a failure.
But there are some apparent fundamental weaknesses of the parameters section, such as:
- The property name in the JSON is the logical name of the parameter, in fact in general the JSON property name is the logical name of any parameter or resource in the template.
- In the absence of an extenuating circumstance, the logical name will be used as the label for the input field in the form where the data is collected. So the user is going to see labels like VPCCIDR and PrivateSubnetBCIDR etc., which isn’t ideal from a usability point of view. I’ll explain what I mean by extenuating circumstances in just a moment.
- The order of the fields is not preserved in the form. For instance, one of the sample templates I played with for WordPress had DBUser and DBPassword parameters, but they were in the form in the opposite order, I assume because it’s just displaying them in alphabetical order, but it was not in the order they were declared, so I assumed you can’t control the order. This was bad for me, because try as I might, I always tried to put the user name in the password field and vice versa, since no form generally asks for the password before the user name.
All of these apparent weakness can be overcome, but not by anything that you can do in the parameters section. In fact, they are overcome by putting some stuff in the metadata section. You can determine the order of the parameters in the form, provide friendly names for the labels, and even organize the fields into groups to be displayed under headers. Which is why I went out of order. It’s kind of hard to talk about organizing parameters, when you haven’t talked about the parameters yet.
Metadata, What is it Good For?
So what can I put in the metadata section. Short answer is, anything I want. So I can put a license field in here. And a description field. People often complain that you can’t put comments in JSON, but you can put in descriptions and metadata in a number of places, which done right can serve much the same purpose as comments. I can also put in a field called Aardvark, with a value of “banana daiquiri”. Why? I can’t think of a good reason for that, but the point is that the metadata section is an arbitrary collection of properties that I can use for any purpose I can dream up.
That said, there are few properties that have special meaning to CloudFormation, as well as an expected structure for the value. All of them are optional, as is the metadata section as a whole. We’re only going to use one of those CloudFormation specific metadata sections, and it’s called “AWS::CloudFormation::Interface”. So my metadata section looks like this:
1 2 3 4 5 6 7 8 9 10 11 12 13 14 15 16 17 18 19 20 21 22 23 24 25 26 27 28 29 30 31 32 33 34 35 36 37 38 39 40 41 42 43 44 45 46 | "Metadata": { "LICENSE": "MIT License, Copyright (c) 2019 Joe McShea", "AWS::CloudFormation::Interface": { "ParameterGroups": [{ "Label": { "default": "Virtual Private Cloud Configuration" }, "Parameters": [ "AvailabilityZones", "VPCCIDR" ] }, { "Label": { "default": "Subnet Configuration" }, "Parameters": [ "PublicSubnetACIDR", "PublicSubnetBCIDR", "PrivateSubnetACIDR", "PrivateSubnetBCIDR" ] } ], "ParameterLabels": { "AvailabilityZones": { "default": "Availability Zones" }, "PublicSubnetACIDR": { "default": "Public Subnet 1 CIDR" }, "PublicSubnetBCIDR": { "default": "Public Subnet 2 CIDR" }, "PrivateSubnetACIDR": { "default": "Private Subnet 1 CIDR" }, "PrivateSubnetBCIDR": { "default": "Private Subnet 2 CIDR" }, "VPCCIDR": { "default": "VPC CIDR" } } } }, |
It’s probably fairly obvious what’s going on here, but this is a tutorial for CloudFormation newbies, so let me explain. There are basically two properties:
- The first property lets me group and order my parameters, and provide a section header for each group, all of which control the form as it’s displayed to the user during instantiation. That solves most of the problems I had with parameters in one fell swoop.
- And the second section solves my remaining issue; it lets me provide user friendly labels for my parameters to be used in the instantiation form.
I see many sample templates out there that don’t use this metadata section at all. And as such, I was working with templates for a few weeks before I ever came across any kind explanation of this section. As a web developer, not using this section in any template pretty much offends my sensibilities. A well designed form is better than any amount of documentation, and who documents their templates anyway? I mean, besides me of course.
The Basic Building Blocks (aka resources) of a VPC
Now it’s time to start fleshing out the resources section of our template. At the root of a Virtual Private Cloud, you need to define a VPC resource. That’s just an object, which has a type of “AWS::EC2::VPC”, and it looks kind of like:
1 2 3 4 5 6 7 8 9 10 11 12 13 14 15 16 17 18 19 20 21 22 23 24 25 26 27 28 29 30 | "VPC": { "Type": "AWS::EC2::VPC", "Properties": { "CidrBlock": { "Ref": "VPCCIDR" }, "EnableDnsSupport": true, "EnableDnsHostnames": true, "InstanceTenancy": "default", "Tags": [{ "Key": "Name", "Value": { "Fn::Sub": "${AWS::StackName}" } }, { "Key": "StackName", "Value": { "Fn::Sub": "${AWS::StackName}" } }, { "Key": "CIDR", "Value": { "Ref": "VPCCIDR" } } ] } }, |
Remember, that first string is just the logical name of the object. In this case, I’ve called it VPC, because that’s just how I roll. You can name it any thing you like, but whatever you name it, that’s how your going to refer back to it in other objects in your template. The VPC declaration has the following properties:
- CidrBlock: this is just a TCP/IP address range, like 172.24.0.0/16, which defines a network address of 172.24.0.0 with 16 significant bits, so the 0.0 at the end represents two numbers from 0 to 255 that can be used to address individual nodes or subnets inside my VPC.
- EnableDnsSupport: generally this should be true. It determines if the Amazon provided DNS service in the VPC that resolves public DNS hostnames to IP addresses is enabled or not.
- EnableDnsHostnames: also generally true. If enabled, instances in the VPC get DNS hostnames; otherwise, they do not.
- InstanceTenancy: default just means that your VPC will run on shared hardware, which is the normal case for cloud hosted infrastructure. You can also choose to run on dedicated hardware at an increased fee, and there are reasonable use cases for using this like governance and compliance, but that’s a bit beyond the scope of this post.
- Tags: a collection of name/value pairs that you can use for anything you like.
Don’t neglect tags, they’re very important. That’s best explained by an example. Later in this series, we’re going to setup a NAT instance (Network Address Translation). This instance will allow private networks to talk to the Internet by routing traffic to the Internet and translating private addresses into public IP addresses and back again as traffic passes through them. This allows you to run commands on your private instances like “yum update”, which wouldn’t normally work because your private instances don’t have publicly routable IP addresses.
Now in order for this to work, the NAT will need to query for all private subnets in your VPC, so it can add itself as the default route in the route tables of those networks. But how is it going to know if a subnet is public or private? It will be a lot easier if your subnets all have a tag with a key of “Network” and a value of either “Public” or “Private”. Since in any given region, you may have multiple VPCs, and each VPC may have multiple stacks on it, it also may prove useful to have a tag with a key of “StackName” and a value of the name that was given to the stack during instantiation. In general, logical application of tagging will solve many seemingly insurmountable issues down the road, but you can always add tags later if you find you need them, so don’t panic if you can’t currently envision what tags you may need down the line.
Note that the CIDR block is assigned a value of { “Ref”: “VPCCIDR” }, so what’s that all about? Ref is an example of what CloudFormation calls an intrinsic function. Ref allows you to refer to, or reference, another parameter or resource in your stack by logical name. In this case I’m referencing the VPCCIDR parameter, so it’s value will be inserted here. If I reference another resource, something useful is inserted, usually the id of the resource I believe.
There is also another intrinsic function used in the resource above, and that is FN::Sub. It allows me to substitute environment variables that are defined by CloudFormation during instantiation. In this case I’m referring to the name of the stack. I’ll try to remember to explain each intrinsic function I use as I get to it. You can easily get a list of intrinsic functions by going to your favorite search engine an entering “aws intrinsic functions” and it will probably take you right to Amazon’s documentation (unless your favorite search engine kind of sucks). Get to know them; if you’re going to do CloudFormation, they’re your new best friend.
The next thing your VPC is probably going to need is a way to get to the Internet. That’s what the following two declarations provide:
1 2 3 4 5 6 7 8 9 10 11 12 13 14 | "IGW": { "Type": "AWS::EC2::InternetGateway" }, "VPCGatewayAttachment": { "Type": "AWS::EC2::VPCGatewayAttachment", "Properties": { "VpcId": { "Ref": "VPC" }, "InternetGatewayId": { "Ref": "IGW" } } }, |
The first one defines an Internet gateway logically name IGW, and really couldn’t be much simpler. In general, there are two things you need to provide in order for a subnet to be publicly accessible. The VPC must have an Internet Gateway and the subnet must have a default route that points to the Internet Gateway. We’ve just taken care of the first requirement, we’ll talk about routing a bit further down the page.
The second declaration is of type “AWS::EC2::VPCGatewayAttachment”, and as it’s name implies, it attaches an IGW to a particular VPC.
This pattern of declaring two objects and then declaring a third object that joins them together is fairly common in CloudFormation. And much like a SQL join, the joining object may define a one-to-one association, or one-to many, or maybe even many-to-many (though I haven’t actually seen this last one yet if it exists).
Now the last basic building block of a VPC is the subnet. From my picture above, I’m going to need four of them, two private and two public. But the declarations are mostly the same for all four of them. The difference will be how I setup routing for the subnet, but that’s getting ahead of ourselves. Since the declarations are pretty much the same, here is the declaration for the first public subnet:
1 2 3 4 5 6 7 8 9 10 11 12 13 14 15 16 17 18 19 20 21 22 23 24 25 26 27 28 29 30 31 32 33 34 35 36 37 38 39 40 41 | "SubnetAPublic": { "Type": "AWS::EC2::Subnet", "Properties": { "AvailabilityZone": { "Fn::Select": [ "0", { "Ref": "AvailabilityZones" } ] }, "CidrBlock": { "Ref": "PublicSubnetACIDR" }, "MapPublicIpOnLaunch": true, "VpcId": { "Ref": "VPC" }, "Tags": [{ "Key": "Name", "Value": "Subnet A Public" }, { "Key": "StackName", "Value": { "Fn::Sub": "${AWS::StackName}" } }, { "Key": "CIDR", "Value": { "Ref": "PublicSubnetACIDR" } }, { "Key": "Network", "Value": "Public" } ] } }, |
First note that the only things in this declaration that indicate that it’s public are the logical name and a tag. These two things are arbitrary, and useful only for my own purposes, not to CloudFormation. In other words, CloudFormation does not know that my intent is for this to be a public subnet. I’ll tell it that in declarations that will follow later in the post.
The first property of this resource is the AvailabilityZone, which uses another intrinsic function called “FN::Select” (most intrinsic function begin with FN:: to indicate that it’s a function). Select takes two parameters, an index, and a list of something. In this case the something is a reference to the parameter AvailabilityZones, which you may recall from earlier was defined as of type “List<AWS::EC2::AvailabilityZone::Name>”. So this is going to assign the 0th element from that list, which is what I meant earlier when I said that I’d hard-coded this template to use two availability zones, because I only select the 0th and 1st elements from the list in this template. All that just to say that this is going to assign this subnet to something like us-east-1a.
And this is followed by three more subnet declarations that look pretty much the same. Slightly different names, slightly different tags, and maybe reference the 1st availability zone instead of the 0th, but pretty much the same.
That about does it for the basic VPC with 4 subnets. Now we’re going to decorate those resources with some behavior like routing, security, etc.
Routing
I’ve mentioned routing a couple of times already, and finally we’re ready to start talking about it. The following declares a route table:
1 2 3 4 5 6 7 8 9 10 11 12 13 14 15 16 17 | "RouteTableAPublic": { "Type": "AWS::EC2::RouteTable", "Properties": { "VpcId": { "Ref": "VPC" }, "Tags": [{ "Key": "Name", "Value": "Subnet A Public Routes" }, { "Key": "Network", "Value": "Public" } ] } }, |
Next comes a declaration that’s going to join my new route table with a subnet, so here’s that pattern again:
1 2 3 4 5 6 7 8 9 10 11 | "RouteTableAssociationAPublic": { "Type": "AWS::EC2::SubnetRouteTableAssociation", "Properties": { "SubnetId": { "Ref": "SubnetAPublic" }, "RouteTableId": { "Ref": "RouteTableAPublic" } } }, |
This defines a one-to-one association between a route table and a subnet. But this doesn’t have to be one-to-one. Each subnet needs a route table, but a route table can be used by multiple subnets, so this could be a one-to-many association.
And thinking about it logically, both of my public networks are probably going to have the same routes. Same for the two private subnets. So I should probably only have two route tables, and the associations should be one to many. But that’s not what I have. I’ve declare four route tables and four one to one associations. Why? Because I didn’t know that when I started and the sample templates did it this way so I did it this way. I should probably go back and fix that. It will make maintaining the routing a bit easier.
Anyway, now I have a route table associated with each of my subnets. But I don’t have any routes defined. This next declaration is going to define a route and associate it with a route table:
1 2 3 4 5 6 7 8 9 10 11 12 13 | "RouteTableAPublicInternetRoute": { "Type": "AWS::EC2::Route", "DependsOn": "VPCGatewayAttachment", "Properties": { "RouteTableId": { "Ref": "RouteTableAPublic" }, "DestinationCidrBlock": "0.0.0.0/0", "GatewayId": { "Ref": "IGW" } } }, |
This is the default route (as evidenced by the destination CIDR or 0.0.0.0/0). It basically says anything that isn’t local should be routed to my Internet Gateway (IGW). This satisfies my requirements for a public network. I have an Internet Gateway and a default route that points to it.
Note that there are two route tables defined for my private networks, but no routes are defined for those route tables. So how does that work? Each subnet needs a route table. But each route table has a built-in route that handles anything that is local (defined as anything that is within the CIDR address range of my VPC). So I don’t need to define any routes in order for a route table to be useful. There’s basically a magic router somewhere that you can’t see that makes sure everything in your VPC can route traffic to anything else in your VPC.
Network Access Control Lists (NACLs)
And finally we come to our last set of resources for our template, and that is Network Access Control Lists (NACLs). Think of this as the border firewall for your subnet. It defines what TCP/IP traffic is allowed into and out of your subnet.
Here is the definition of a NACL for my public subnets:
1 2 3 4 5 6 7 8 9 10 11 12 13 14 15 16 17 | "NetworkAclPublic": { "Type": "AWS::EC2::NetworkAcl", "Properties": { "VpcId": { "Ref": "VPC" }, "Tags": [{ "Key": "Name", "Value": "Public NACL" }, { "Key": "Network", "Value": "Public" } ] } }, |
It is associated with a VPC, but not yet with a subnet. To associate it with a subnet, I need to declare another association like so:
1 2 3 4 5 6 7 8 9 10 11 | "SubnetNetworkAclAssociationAPublic": { "Type": "AWS::EC2::SubnetNetworkAclAssociation", "Properties": { "SubnetId": { "Ref": "SubnetAPublic" }, "NetworkAclId": { "Ref": "NetworkAclPublic" } } }, |
As far as I know, this can only be a one-to-one association. But I just implied a few seconds ago that my NACL was for both public subnets. A NACL can be shared by subnets within the VPC, but to do so you need to have two separate association entries. So I have a public NACL and two association which each associate my NACL with a public subnet. Then I have equivalent declarations for my private subnets.
And last but not least, I have a rule for my NACL, which just allows some sort of traffic into or out of my network. These rules are stateless, meaning that if you allow HTTP into your network, but don’t allow it outbound, HTTP isn’t going to work very well. So here’s the rule:
1 2 3 4 5 6 7 8 9 10 11 12 13 | "NetworkAclEntryInPublicAllowAll": { "Type": "AWS::EC2::NetworkAclEntry", "Properties": { "NetworkAclId": { "Ref": "NetworkAclPublic" }, "RuleNumber": 99, "Protocol": -1, "RuleAction": "allow", "Egress": false, "CidrBlock": "0.0.0.0/0" } }, |
This rule specifically allows all TCP/IP traffic into my network. I know that because the protocol is -1 (all ports), the allowed CidrBlock is 0.0.0.0/0 (all addresses), the action is “allow”, and egress is set to false (making it an ingress rule). And it is associated with a particular NACL.
I also have an egress rule in my template for the same NACL, that allows all egress traffic. And a private NACL with two associations to my private subnets and two similar NACL rules that allow all traffic. So basically, I’m blowing off security for now.
Now I have read in several places, and even been told in an Architecting in AWS – Associate Level course, the advice that you should allow all traffic through your NACL and enforce security through security groups (which we’ll talk about in an upcoming blog post). I don’t really agree with that; you’re supposed to implement defense in depth, so if one layer of your security is compromised, you’re still protected. In fact, ideally you should enforce security at the NACL level, again at the security group level, and finally at the OS level (i.e. in Linux you can run a local firewall like iptables, and configure it to only allow specific traffic into the box).
On the other hand, I do agree that while you’re setting things up and trying to figure this stuff out, you should stick to that advice and just secure the security groups. It just makes troubleshooting connectivity issues easier. But once you’ve got everything setup and working the way you want it, you should go back and lock down your NACLs. So I’ll probably do a later post where I do just that. And once that’s working, do the OS level, so maybe I’ll even do a post on that. But for now we’re done with the resources section of our template.
Outputs from my VPC template
The last section of our template is called Outputs, and it is optional. It just lets you spit out some output from your template after it has been instantiated (available from the Outputs tab of your stack in the console). So you can put anything in here that you think might be useful later:
1 2 3 4 5 6 7 8 9 10 11 12 13 14 15 16 17 18 19 20 21 22 23 24 25 26 27 28 29 30 31 32 33 34 35 36 37 | "Outputs": { "TemplateID": { "Description": "VPC with 2 availability zones, each with one public and one private subnet.", "Value": "intellipoint-vpc-template-id." }, "StackName": { "Description": "Stack name.", "Value": { "Fn::Sub": "${AWS::StackName}" } }, "CidrBlock": { "Description": "The range of IP addresses for the VPC.", "Value": { "Fn::GetAtt": [ "VPC", "CidrBlock" ] }, "Export": { "Name": { "Fn::Sub": "${AWS::StackName}-CidrBlock" } } }, "VPC": { "Description": "The VPC.", "Value": { "Ref": "VPC" }, "Export": { "Name": { "Fn::Sub": "${AWS::StackName}-VPC" } } } } |
I’m using another intrinsic function here call FN::GetAtt. The Ref function I called earlier allowed me to reference a resource and get back some value from it that I couldn’t specify but was whatever CloudFormation thought I might need (usually the id of the resource). FN::GetAtt let’s me reference another resource in my stack, but I pass in a second parameter which is the name of the property I want to get back from the resource, in this case the CidrBlock property.
Instantiation the VPC
So now I have a template. What can I do with it? I can instantiate it in the AWS console. So now I’m going to walk you through that. But first, if you’re writing a template from scratch, you probably don’t want to write 600 lines of JSON and then instantiate it for the first time. You can instantiate it with just a VPC and nothing else, so you should probably try it at numerous points along the way, because it will be easier to troubleshoot issues if you introduce new resources one or a few at a time.
I’ve been writing this with the assumption that you’re fairly new to AWS, as I was a couple of months ago. I mean, technically I’ve been using AWS for years, but by that I mean I come in in the morning and spin up a development machine, and then I develop stuff all day, and then I take it back down in the evening. And most days, that’s really all the interaction I have with it. Anyway, up to now, I’ve used the term stack repeatedly without any kind of definition, which isn’t very reasonable for a newbie article. A stack is basically just an instance of a CloudFormation template. To create one, you go to CloudFormation in the AWS console and click “Add Stack”. It will ask you for your template. You can choose one of Amazon’s sample templates, or to read a template from an S3 bucket, or you can just upload a file from your computer (which is mostly what I do when actively working on a template).
Next it will ask you for a stack name. Choose wisely, because you cannot change this later. If you must, you’ll need to delete your stack and any stacks that depend on your stack, and re-instantiate them from scratch with the new name, which is time consuming to say the least, and if it’s a production system, well there are certain difficulties you’re going to have to figure out how to get around in order to avoid significant down time.
So let’s walk through creating a stack from my template. In the AWS console, go to CloudFormation. Click on the “Create Stack” button on the right-hand side:
First, it will ask about your template:
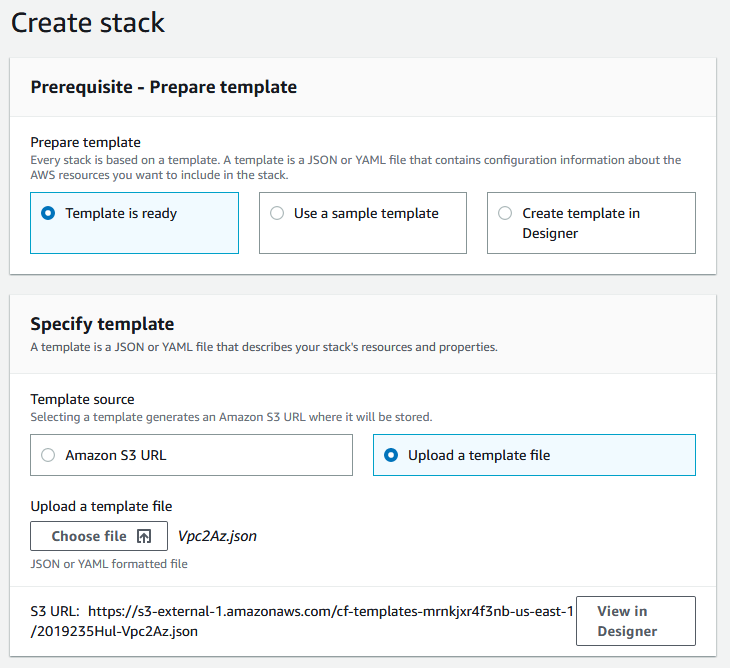
Choose “template is ready”, “upload a template file”, click the “choose file” button, and navigate to Vpc2Az.json (this is the template file in the download at the bottom of this post). Once you choose a file, it does some rudimentary validation, so if there are glaring errors it will tell you that and not let you proceed. There are two things I want you to notice before we move on.
- First, if you look underneath where you chose a file, there is an S3 path to your file. That’s because it has already uploaded your template to an S3 bucket (which it also just created if this is your first cloud formation template).
- Second, next to that is a button that says view in designer. This will load your template up into a visual designer for templates in the browser. It’s here that you can choose if you like to convert the template from JSON to YAML or not.
Now I’m sure the CloudFormation designer is a wonderful tool in it’s own right, but haven’t really used it yet except to convert YAML to JSON. Why? Because I think you need to understand templates some before you can use the designer effectively. And now that I understand templates a bit, I’m not sure I’ll ever use the designer, but we’ll see. Why? Because the designer puts a whole lot of shit in the metadata sections of your template. Like when you drag and drop some component to the right like an application load balancer, because you want your picture to look better, it stores the information about where you put it in the metadata. This can very quickly double or even more the size of your template. And now that I know doing templates from scratch isn’t that hard, I may just prefer to keep them cleaner than that.
Anyway, click next, which will take you to the stack details page:
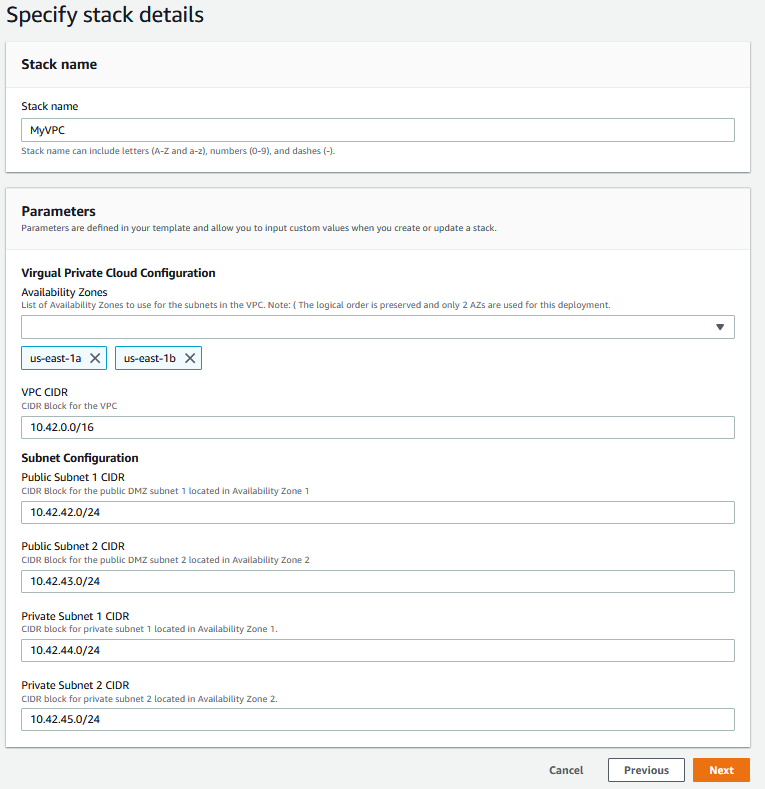
First, you need to give your stack a name. And remember, you can’t change this later. You can only delete the stack, and anything that depends on the stack, and start over.
Next come the parameters, and as you can see, they’re grouped and order as described in my metadata, and have the friendly labels I specified. I choose exactly two subnets. Then I put in VPC and subnet CIDR addresses that make sense. If you’re not that comfortable with network addresses and subnets, you can just plug in what I did, but you also probably need to get more comfortable with them too if AWS is the world you want to play in. I may write a small series on basic networking for AWS, but I’ve barely started this series so lets not get ahead of ourselves.
Anyway, now I want you to click next -> next -> create template. There are two whole big pages full of options I just had you skip over. I’m sure there are many wonderful options on those two pages, but we don’t need them right now, so lets not get distracted. If all goes well, that will take me to the details page for my new stack, on the Events tab:
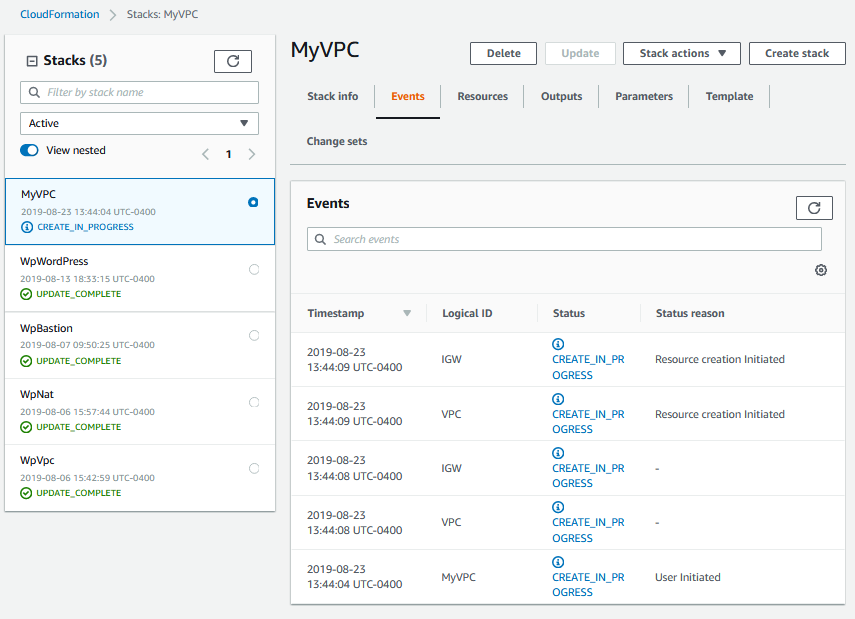
Here I’ll see some kind of messages telling me CloudFormation has started provisioning my stack. If I click the refresh button occasionally, it will show me more event messages as it tries, and hopefully succeeds, to create more resources. If I click the refresh button over and over, as fast as I can, Amazon will eventually slap me on the wrist and stop servicing my request for some brief period of time that will seem like a year (I think it’s like 10 minutes, don’t ask me how I know that). Eventually, the status on my stack, in the left-hand side should turn green and say Create Complete.
Now, click on the Outputs tab, and you’ll see the outputs we put in our template:

Congradulations! If you got this far, you’ve just successfully instantiated a CloudFormation template.
Sum Up
I read on somebody’s blog that it takes a month for somebody to get marginally comfortable working with CloudFormation and templates. I can’t find it now or I would link to it, but for me that was a pretty accurate estimate. And that’s not a month playing foosball and ping pong, and occasionally stopping by my desk to do a little work. I put in long days and inundated myself with this stuff. If I’d done it a little at a time, it could have been more like 3 to 6 months. Anyway, this series is what I wish I’d found a month ago.
So what’s the big deal about Infrastructure as Code? I’ve just spent days building this JSON monstrosity. And it does something I could do in the AWS console in an hour or two. What’s the point? The point is that I can reuse this and create the backbone for any two tier application in minutes instead of hours.
Also, I can spin up test and dev networks in 10 to 30 minutes, and rest assured that they match what’s in production. I can’t tell you how many times I’ve had a conversation with an engineer who said something like, what you have to understand is that test and production are a little different. Err, that’s not good! There’s very little point in installing my application in a test environment unless it mimics production pretty accurately. And if you don’t automate these things, no matter how much documentation you write there will always be subtle differences between environments that are supposed to be the same. That’s why Infrastructure as Code is of interest to me.
My next post in this series will be about provisioning an auto-healing Bastion host for my VPC. This will be the only host in my VPC that you can log into from the Internet. To do administration on any other machine, I’ll have to go through this Bastion.
Reference
- Getting Started with AWS CloudFormation – a nice place to start, but the WordPress template they’re using doesn’t actually work any more. That is to say, when you instantiate it you will find that WordPress errors out. That’s because it uses an AMI that has PHP 5.2 installed, but gets the latest WordPress which requires at least 5.6.1. Upgrade the Linux machine to PHP 7.2 and that will fix it.
- Writing Your First CloudFormation Template – a post about an extremely simple CloudFormation template that just provisions an S3 bucket.
- A Simple Introduction to AWS CloudFormation Part 1: EC2 Instance – the beginning of a series of blog posts about CloudFormation that I wish I’d found at the beginning of my jorney.
- CloudFormation Sample Solutions – a nice collection of sample templates from Amazon. They’re all pretty old, but quite useful to peruse if your trying to figure out how to do something.